DL&CV
通用CNN学习记录帖
- Semantic Aanlysis of Computer Vision
- Parameters clarification in Conv1d
- DIC, PIV and basic CV algorithms
Agent Learning
Auto-driving in unity
Github Repo: {Link} and Medium post {Link}
ML-agent Official Github Repo: {Link}
The challenge is in set up the environment I would say.
The cAr-driving seems to be more interesting.
The cAr project above uses ML-Agent 1.0 that need updating to 2.0.
I have done it by replacing serveral functions in carAgent. Now the inference mode works properly. Only need to connect it to python for Deep Learning development.
Conda setup
|
1 2 |
conda create -n mlagents python=3.10 && conda activate mlagents conda install pytorch==1.13.1 pytorch-cuda=11.6 -c pytorch -c nvidia |
Install mlagents package
|
1 |
python -m pip install mlagents |
Interpretable Deep Learning
Layer-wise Relevance Propagation (LRP)
Github Repo for VGG in PyTorch: https://github.com/kaifishr/PyTorchRelevancePropagation
The 3 references are all important.
Explanation with tutorial: https://git.tu-berlin.de/gmontavon/lrp-tutorial
Mixture Density Network (MDN)
probability based deep learning predicting mu and std. {Toward Datascience}
This median post provide guide for probability distribution type selection: {Medium}
For example,
- Time-to-failure use Weilbull as they are all positive.
- Negative Binomial for discrete variables.
This github gives a simple 1-d MDN, which I can use a quick start. {github}
coding tips
-
The order of BatchNorm, Dropout, Activation
-> CONV/FC -> BatchNorm -> ReLu(or other activation) -> Dropout -> CONV/FC ->
Note: It is unusual to use dropout in conv.
{Link-stackoverflow} -
A decent way to UNet implementation: {Link}
Model-gnoistic: Retrieve intermediate output in pytorch
|
1 2 3 4 5 6 7 |
model = <your model> from torchvision.models.feature_extraction import create_feature_extractor return_nodes = ["bn3", 'bn4', 'bn5'] model2 = create_feature_extractor(model, return_nodes=return_nodes) itmOut = model2(torch.tensor(X).unsqueeze(1)) |
Channels and conv explained in Matrix
- Graphic is easier for stride, padding determination.
- Matrix is easier for calculation process comprehesion.
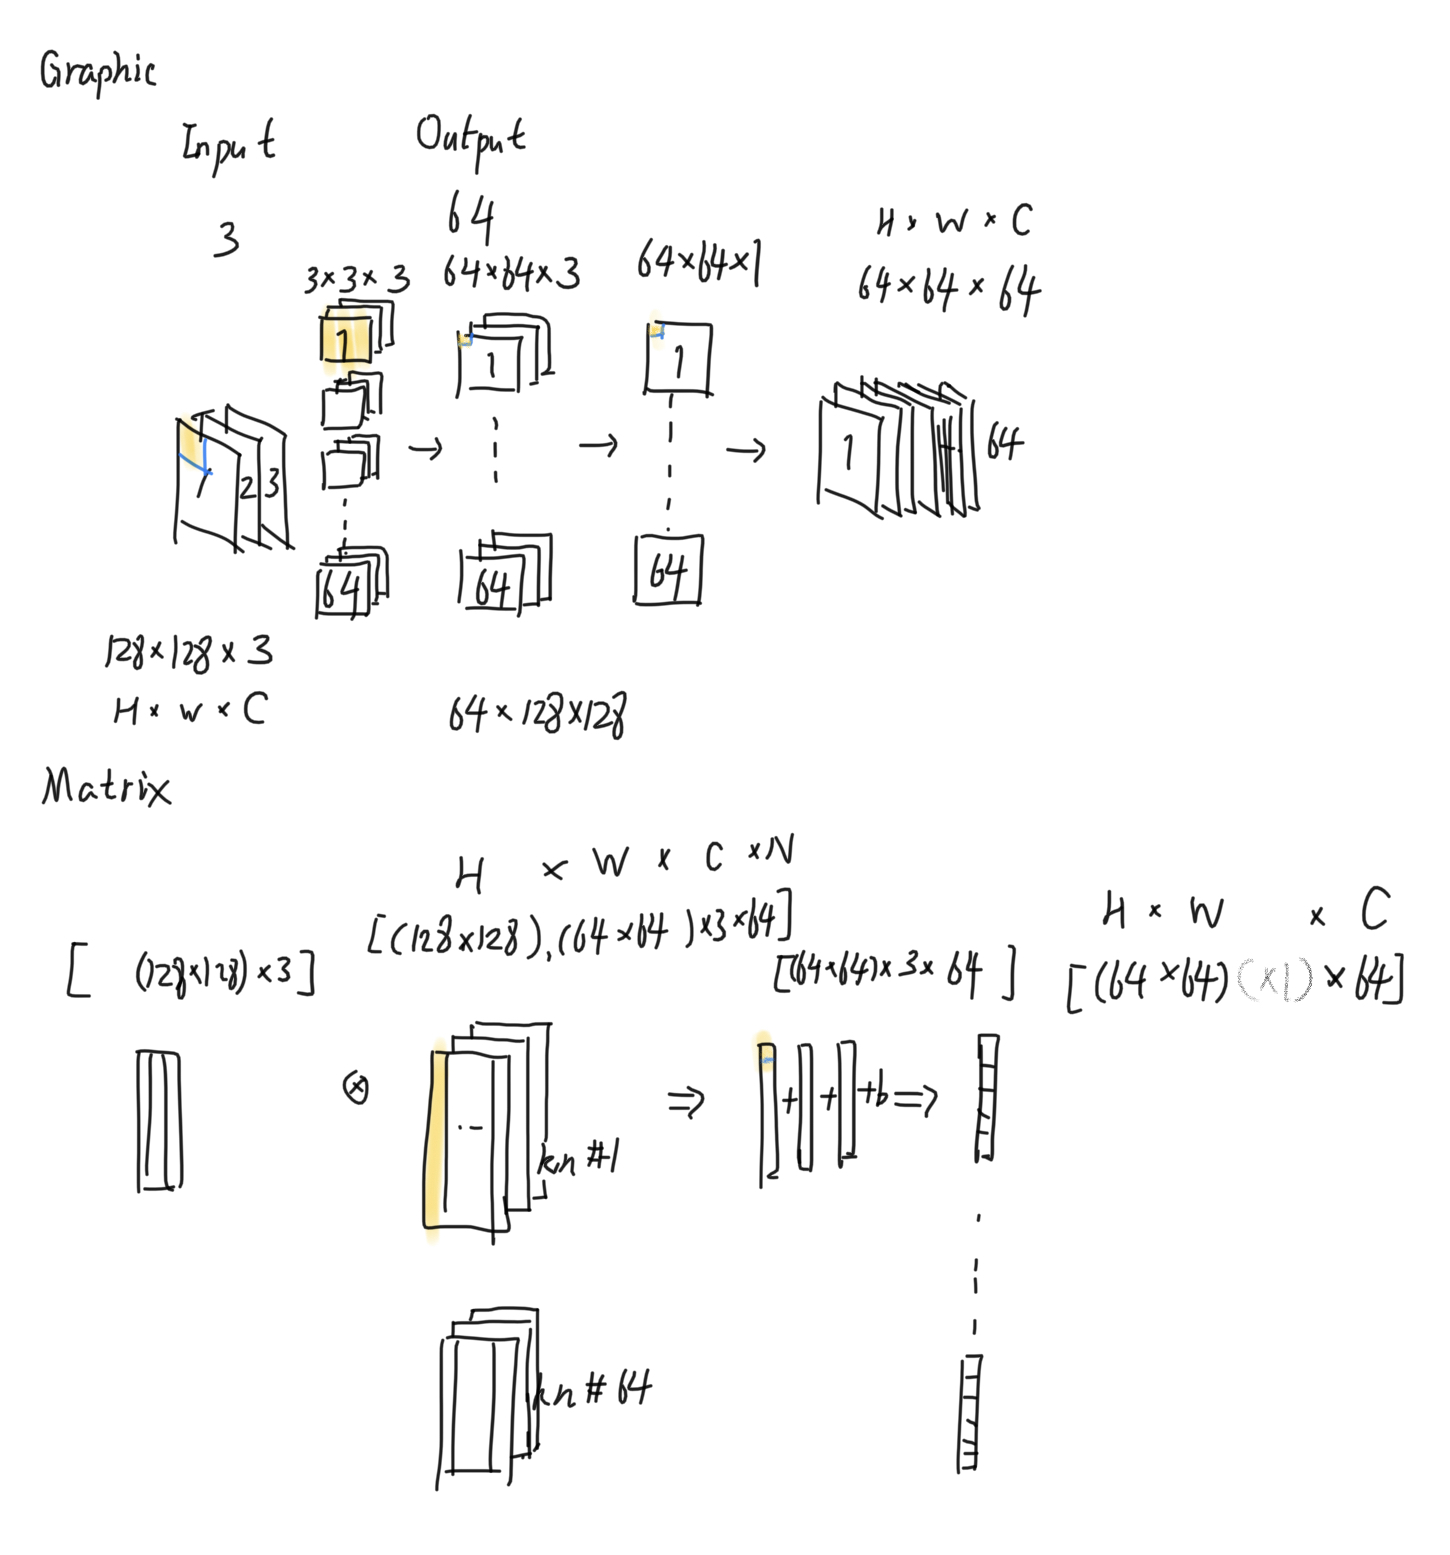
verify with pytorch
123456import torchconv1d = torch.nn.Conv1d(2,1,2,1)conv1d.weight.data = torch.eye(2).unsqueeze(0) # PT requires minimal 3 dimension weightsconv1d.bias.data = torch.zeros(1)inp = torch.tensor([[[1.,2.,0.],[0.,3.,4.]]])out = conv1d(inp)return:
123456789weight:[[[1,0],[0,1]]]out:[[[4., 6.]]], grad_fn=because:4= mean( channel_1: [1,0](x)[1,2]=1, channel_2: [0,1](x)[0,3]=3 )6= mean( channel_2: [1,0](x)[0,3]=0, channel_2: [0,1](x)[3,4]=4 )note: (x) is convolution/cross productthe squeeze also support that output of each kernel will be averaged and squeezed to 1 vector.
In a nutshell, N_kernel = N_out_channel. Shown below, when raise the number of output channels from 1 to 3, kernel shape varies from (1,2,2) to (3,2,2), where shapes in format (n_kernel, n_in_channel, size_kernel) for the Conv1d opertion.12torch.nn.Conv1d(2,3,2,1).weight.data.shapeOut: torch.Size([3, 2, 2])
understanding of Conv1d
|
1 |
torch.nn.Conv1d(in_channels, out_channels, kernel_size, stride=1, padding=0, dilation=1, groups=1, bias=True) |
out_channels meremly determines the number of output matrix, the shape of the output matrix is determined by kernel size, padding and stride, etc.
The convolution locates on third dimension of input signals. As claimed in the official docs:
![]()
in_channel, out_channels has no effect on the input and output shape
![]()
cross-correlation vs convolution
conv
for 1 dimmensional signal, at each sample ![]() we have
we have
![]()
or a common case of computer vision for 2D discrete pixels.
For any arbitary pixel ![]() (the pixel that is the
(the pixel that is the ![]() in horizontal
in horizontal ![]() in vertical), the new value for it is:
in vertical), the new value for it is:
![]()
here, ![]() is half of the total pixels of the kernel along horizontal and vertical directions. The summation is operating u and v, which is the coordinator of the pixels on kernel function
is half of the total pixels of the kernel along horizontal and vertical directions. The summation is operating u and v, which is the coordinator of the pixels on kernel function ![]()
cross correlation
Again for a Computer Vision example, but it is figure matching now.
Regard the target figure is ![]() , database figure is
, database figure is ![]() .
.
![]()
The higher ![]() , the similar the selected region to the target figure.
, the similar the selected region to the target figure.
Compare & Contrast
- Note that: Conv and Xcorr has opposite sign in

It says that Convolution is created for attenuation signal processing. Thus, conv is actually cross-correlation of flipped attenuation signal and collected feedback waveform.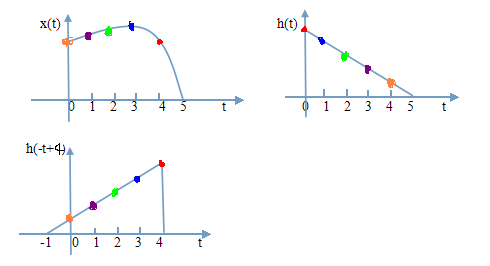
- Another example is why convolution is preferred than cross correlation is that convolution does not flip the original input. {Ref:CSDN}
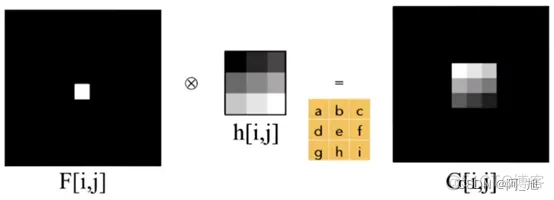
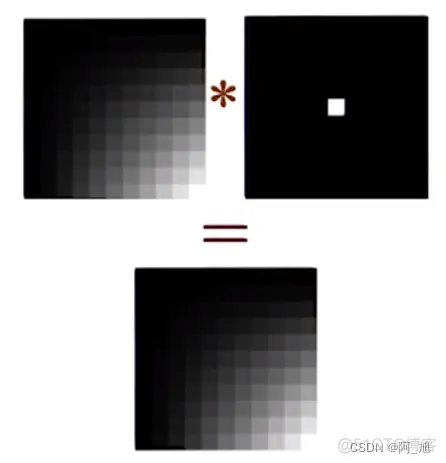
- However, most Convolution Neural Networks packages actually do cross correlation in kernel, since it has a much simpler implementation. The only difference is the Xcor get a flipped kernel data of convolution, which has negligible effect on non-physical scenario, such as facial recognitio
Experience and notes on CNN building
-
The optimal order of BatchNorm, Dropout, Activation {Ref-stackoverflow}
-> CONV/FC -> BatchNorm -> ReLu(or other activation) -> Dropout -> CONV/FC -> -
Fast implementation of UNet {Ref-Github}
-
LR, rand_seed, optimization features, are most commonly used.
Don’t think about adaptability too much before it is really necessary. -
Random thoughts after PyTorch Book
- Can build class for basic conv block for high reusability.
- Looking for competent model on Kaggle
- Start from easy model first.
DIC- – Digital Image Correlation
An MIT developed open source software – MultiDIC:
Brief understanding:
Compare images gird taken by cameras from different anlges and find those with maximum correlations (see wiki for math equation) to rebuild the displacement field so as to study how strain or crack develops.
{Wiki-Link}
{MultiDIC-Journal_Paper}
PIV — Particle Image Velocimetry
A open source PIVlab {Matlab-Link}
Use laser projected sheet and Computer vision algorithm (various sized windows) to plot the velocity field in fluid (liquid or sand).
This work combined PIV and DIC. The authors use PIV for fluid field, and DIC for the structural response. With their impressive experiment apparatus figure attached here. They place 2 mirrors to better illuminate the specimen with laser sheet.
- Schematic of the experimental setup for the combined PIV/DIC system, including: (a) water tunnel, (b) support, (c) flexible plate, (d) mirrors, (e) laser, (f) camera for PIV, and (g) camera for DIC.
Livestream with Android Phone with OpenCV
Use smartphone to capture and modify it with python OpenCV package.
Thanks so much for youtuber “Python Simplified”.
{Link}
Time Series Preprocessing
Oversampling methods
Full name: Synthetic Minority Oversampling Technique. Compared to random oversampling
It is based ont SMOTE {Link}, which starts from a randomly picked center sample in the minority cluster then interploate between the center and its neigbhour assuming the minority is a convex set (since the interpolation is done by
![]()
CV filters
watershed transform (分水岭算法)
Seperate mutually connected foreground entities. It treat greyscale map as a topography, watershed should have gradient=0. Many improvement methods are proposed to avoid noise disturbance. Opencv and Matlab both support quick implementation.
bilateral filter (双边滤波)
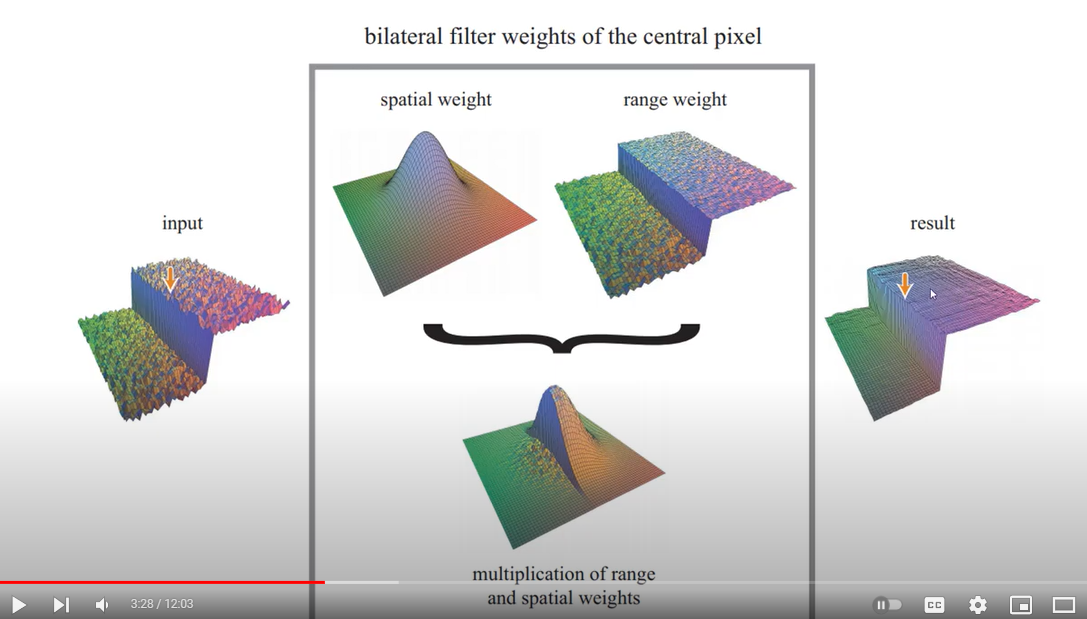
Denoising approach?
{Youtube-with-OpenCV-coding}