Funda of Linux
All about Linux here
WSL openClawd
Official Tutorial for WSL setup {Link}.
Set up Ubuntu in WSL with
wsl --install Ubuntu-24.04 --location D:\WSL\OpenClawd\ --name OpenClawd
Follow the general installation {this} with
curl -fsSL https://openclaw.ai/install.sh | bash
After disclaimer and
QuickStart, I choose the
Qwenwhich suggest 2k free queries per day. It will jump to Qwen website for registration and API authorization.
For channel (chat usage), minimal usage is localhost only, but i pick Slack because I have access to it most of time.
ChatBot (Channel)
Inspired by eagles, I decided the name
boobook, an owl – wisdom but overlooked predator.
In slack, {this} page explains types of tokens. Choose
bot tokenthen it lead to {this} page that shows bots are part of an app following {this} page.
After naming it and choose a workspace, we go to
OAuth&Permission->
Bot Token Scopesection. I gaurantee the following scopes:
chat:write,
user:read,
im:history,
assistant:write,
im.read,
im.writefor sending messages, identifying users, and read chat history, and direct messages.
Find this graph tutorial {Link} suggesting turn on Socket Mode and Event Subscription.
Install the app to a workspace and copy the bot-token starting with
xobx-, also apply for App token back to the basic info page of the slack app, here i only grant the most basic
connections:writescope.
In the
App Home->Message Tab, tick
Allow users to send message...box.
Skip skills for now.
The first message in slack will trigger pairing request, and use the following command to check and approve it.
openclaw pairing list slack
openclaw pairing approve slack <YOUR_USER_ID>
Notice that gateway is automatic installed allowing WebUI local dashboard.
Model Providers
The 20k tokens runs out in less than 1 hour. I applied for Gemini pro and ready to deploy. Then I found this blog {Link} arguing offload to different models, start with cheap primary model then supplement with expensive ones. A example config is {here}.
Trying to upgrade configs to overcome limited token problem. For now, just call
openclaw onboard
to add
Gemini-pro-2.5-flash-liteas the primary model to make it work.
Gemini now only allow 20 requests per day.
Trying
Amazon-Claude-Haiku, $5 per 1M input /5M output tokens, too expensive
Z.ai charge $9 per 3 months.
{Bailian-AliCloud} granted 3-mon trial but no clear API config tutorial yet. Explore later.
Find {this-CN} graphic tutorial, which mentione
openclaw gateway restart
to restart the openclaw services
FInd {this-CN} post with graphic instruction to get free Nvidia API from this link: https://build.nvidia.com/
WIth the following config
"models": {
    "mode": "merge",
    "providers": {
      "nvidia": {
        "baseUrl": "https://integrate.api.nvidia.com/v1",
        "apiKey": "nvapi- 前面复制的Key,也可以用环境变量来配置",
        "api": "openai-completions",
        "models": [
          {
            "id": "minimaxai/minimax-m2.1",
            "name": "Nvidia Minimax m2",
            "reasoning": false,
            "input": [
              "text"
            ],
            "cost": {
              "input": 0,
              "output": 0,
              "cacheRead": 0,
              "cacheWrite": 0
            },
            "contextWindow": 32768,
            "maxTokens": 8192
          }
        ]
      }
    }
  },
  "agents": {
    "defaults": {
      "model": {
        "primary": "nvidia/minimaxai/minimax-m2.1"
      },
      "models": {
        "nvidia/minimaxai/minimax-m2.1": {
          "alias": "Nvidia Minimax m2"
        }
      },
      "maxConcurrent": 4,
      "subagents": {
        "maxConcurrent": 8
      }
    }
  },
Kimi 2.5k is free for limited time on OpenCode now {off_doc}. This is also invalid since it quickly exceed the rate limit somehow.
{This} blog teach how to deploy local LLM with details. Many of it is done by OpenClaw already, just need to redirect.
Currently mainly use {vector-engine} tutorial to set up cheap running APIs. As long as the
providers,
model,
ID, and
authare correct, the config will run.
first small trial to automate Lethe
Testing feedback function.
WSL Kali
As for 250426, simply use wsl --install kali-linux --location D:\WSL\kali_arp\ --name kali_arp
Following this video: {bilibili}.
Use
namp ip_rangeto scan devices.
Handy workflows
Download plain text scripts from git dir
- Click the raw button for a random scripts in that folder with format like:
https://raw.githubusercontent.com/
* - Save that to a
prefix.txt
file, and save list of scripts names intofiles.txt
- Use the code to iterate all lks.txt, append prefix then use wget to download.
for ln in $(cat files.txt); do printf "%s%s\n" "$(cat prefix.txt)" "$ln"| xargs wget; done;
command info search
info # pressto exit Documentation
Linux内存管理与扩容
内存管理
全局占用查看
# 全局占用情况
df -hl

## 注解
df 是报告磁盘空间使用情况的
-h = --human-readable 以常见格式输出大小
-l = --local 只显示本地文件大小
逐层查看内存
# 进入目标路径
cd [path]

# 查看当前路径下内存分布情况
du -h -x --max-depth=1
删除日志文件
运行过程中产生的日志,本次删除的是
var/spool/abrt</em></strong>中的
ccpp-2020-11-28-14:52:27-3689</strong></em>日志文件,大小4.7G。
按照解释,/spool目录下多为mails, news和运行日志,而abrt是Automatic bug report tool的缩写,系统错误日志可以在core中找到。
删除操作如下(也可见后文)
# 删除文件
rm -f %file_name

# 删除文件夹
# rm -rf %directory_name
linux内存管理知识
各英文缩写的解释如下:
| Abbrev. | Name | Define |
|---|---|---|
| LVM | Logic Volume Manager | 逻辑内存管理器 |
| PV | Physic Volume | 物理内存 |
| VG | Volume Group | 根据物理内存分成的内存组 |
| LV | Logic Volume | 逻辑内存 |
硬盘挂载流程
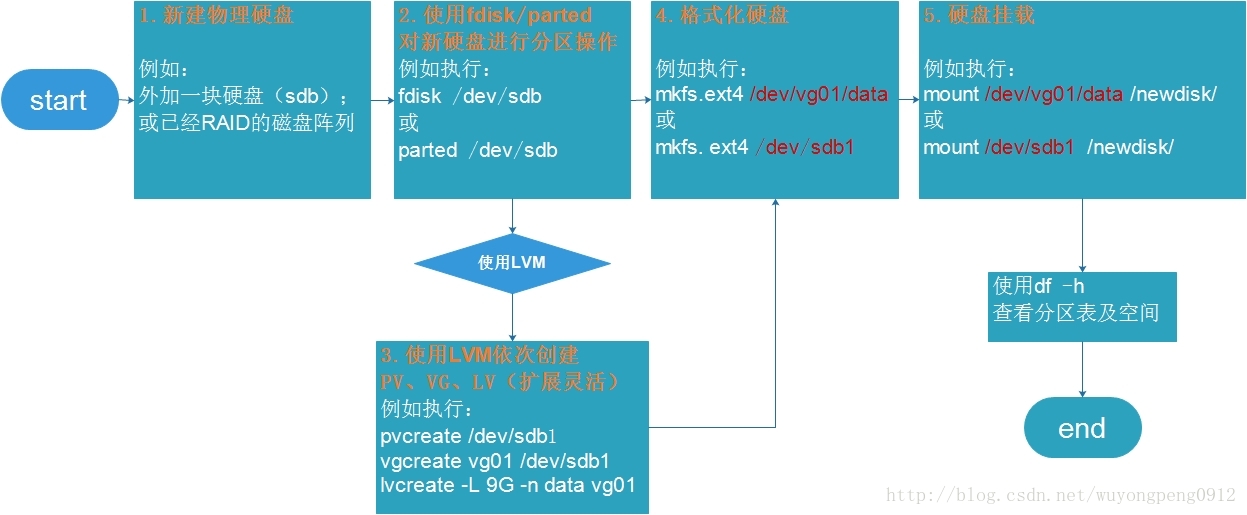
可以直接分区后就格式化,也可以借助LVM。
LVM的优势就是多了一层Virtual Group加工,让后期的内存分配更加灵活(而非Logic Group直接与Physical Volume 关联)。
借助LVM的内存管理机制:
Physical Volume将被格式化为基本单元,划分到不同的Virtural Group中,实际划分Logic Group时再统一从Virtual Group中调用内存。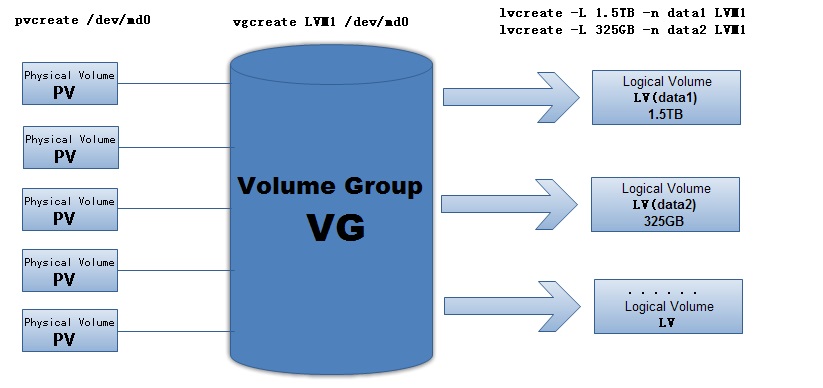
参考:
-
表格形式列出Linux内存管理涉及的各种指令Linux磁盘分区与LVM详解
实战:linux硬盘扩容
Linux公社多图细致解析:https://www.linuxidc.com/Linux/2019-04/158346.htm
涉及流程基本一致,连接物理盘,采用LVM识别常见PV,转化为VG,分配到LV
格式化后将LV分配给现有对应路径下。
使用虚拟机的朋友注意:shared entities 无法expand,离线设置后方可上线。
可以使用lsblk展示当前分区情况
(base) [arc@centos7 ~]$ lsblk
NAME                    MAJ:MIN RM SIZE RO TYPE MOUNTPOINT
sda                       8:0    0  20G  0 disk
├─sda1                    8:1    0   1G  0 part /boot
└─sda2                    8:2    0  19G  0 part
  ├─centos_centos7-root 253:0    0  17G  0 lvm  /
  └─centos_centos7-swap 253:1    0   2G  0 lvm  [SWAP]

## 解释
AME : 这是块设备名。

MAJ:MIN : 本栏显示主要和次要设备号。

RM : 本栏显示设备是否可移动设备。
     设备sdb和sr0的RM值等于1,这说明他们是可移动设备。

SIZE : 本栏列出设备的容量大小信息。

RO : 该项表明设备是否为只读。
     设备的RO值为0,表明他们不是只读的。

TYPE :本栏显示块设备是否是磁盘或磁盘上的一个分区。
       sda和sdb是磁盘,而sr0是只读存储(rom)。

MOUNTPOINT : 本栏指出设备挂载的挂载点。

引自:https://blog.csdn.net/qianggezhishen/article/details/55517714
File Management
删除文件/文件夹
# 删除文件
rm -f %file_name

# 删除文件夹
# rm -rf %directory_name
Packages
查找安装列表
yum list installed | grep 关键字
命令匹配过滤
可支持通配符
卸载
yum remove [package name]
仅支持删除单个包,删除时需要输入全称
但会自动卸载关联包
批量卸载
rpm -qa | grep [包名] |xargs rpm -e --nodeps
解释:
rpm -qa
用 rpm查找所有包rpm -e
卸载--nodeps
仅卸载当前,不考虑依赖xargs
Extended Arguments
形成pipeline传递前一步返回参数(stdin),加工后(分批etc)传递下一级
常用于批量执行命令,类似于传话筒
扩展阅读:cnblogs的详细说明
查找文件
find命令简介
find 路径 -name 名称
find / -name 'genom*'
find /usr -name '*.pdf'
关于:为何要加单引号
批量移动/重命名文件
mv file_a file_b file_c -t file_e
复制就是cp
-t应该是 to的意思,指定结果的
如果是到某个目录下,可以用'/'结尾
Ref: CSDN-Copy and Move
count files
ls -l .csv| wc -l
zip and unzip
unzip *.zip -d ./
link
usually refers to symlink: symbol link or soft link
ln -s %target_file_path %link_path
delete the link by
unlink %link_path
soft v.s. hard
Soft linkis like shortcut in windows. It will be invalid if target file is removed. It is a door to the key.
Hard linkmore like mirroring, it points to the inode (fundamental database). It is another key to the door.
SHARCNET Skills
- command
diff
can distinguish the files, useful in version check - Resource manager
top
, press q> to quit - Append
alias lm="load modulus -i"
in~/.bashrc
to set custom command.
alias
- temporary alias, can run
alias shortcode='full code'
- permanent alias can do
touch ~/.bash_aliases # this requires the ~/.bashrc has inherent support lines.
nano ~/.bash_aliases # edit the file
# add the alias you need
source ~/.bash_aliases # run the scripts
## file download batch download from dropbox`bash wget {dropbox Link} -O download.zip
text pipeline
裁剪
| tr "\n" "\0" | xargs -d"\0"
tr = truncating删减
此处匹配的是逐字符串匹配 '@anaconda'
批量匹配于修改
对于字符串匹配和批量修改,采用sed命令
sed -i 's/OldString/NewString/g' filename
注意该命令多用于文本文档内修改,
尝试用于xargs修改grep返回命令,失败。
permissions
# individual permission setting
chmod u+w $filename # add write permission to user
chmod o+x $filename # add excute permission to public

# absolute setting mode
chmod 137 $filename
# set permission as r--rw-rwx
# where r=read, w=write, x=excute
# each 3 are for user, group. public respectively
vim
vim /etc/%YOUR_FILE% to view the file
Press a to insert content
Press Shift+; to activate command mode.
Enter qto quit, or wq to save and quit, or q! to force quit.
visual mode
for interactive response: {Link}
v
for phrase mode, can also usew
to start of line,V
for line mode, good for copyCtrl
+b
for block mode, good for indent check
Add users
Both
useraddand
addusercan do this. But former is in command form thus requires more options. The latter is preferred usually to avoid compatibility problems.
password change
passwd
# Input current pwd
# Input new pwd twice
# Done!
bash
IP reading pipeline
use alias to give a allocate a nickname for a value, the value is wrapped in " ".
Note that a '\' placed before “$" escapes the "$".
grep is a filter, like 'findstr' command in windows shell
awk is a batch operation software do the same operation line by line.
More about GNU awk see this: https://blog.csdn.net/jasonchen_gbd/article/details/54986434
the dollar mark '$' is a regular expression like sign pointing to the instance at the fourth position.
Inspired by https://www.youtube.com/watch?v=PPQ8m8xQAs8, thanks for sharing.
alias myip="ifconfig | grep broadcast | awk '{print \$2}'"bash scripts with nano
which bash
/usr/bin/bash

cd YOUR_DIR

nano test.sh

# ^x is ctrl+x, M is alt
# write something like this
echo "May I know your name?"
read name
if [ $name ]; then
    echo "Hello, #name !"
else
    echo "I can't hear you!"
fi
# notice two space besides "$name" are vital since bash is space-sensitive
# "fi" in the last row required for loop and judge
Visual Matlab on server
Forwarding Matlab GUI to local
Download: Xming and Putty (Graphic Tutorial)
In Putty Session setup, Connection > SSH > X11. Tick Enable X11 forwarding
Then set
localhost:0.0
Here we assume Xming is listening
localhost:0.0
(Note: In Win OpenSSH, equivalent option is to run
$env:DISPLAY = "localhost:0.0"in powershell)
ssh with x11-forwarding
ssh -X username@hostname
validate forwarding with
xclock
DOS output in UTF-8
Ref:{StackOverflow}
chcp # check current language
chcp 65001 # switch to UTF-8
chcp [mmm] # change back to your original language
Linux Jobs Pipeline Design
- Use
&&
connect the commands to force all line must succeed.;
only count on start or not.||
indicate the tasks are alternative. {Link-2daygeek} - Use
pstree -p <pid>
to check hierachy of process. More multi-thread command see {Link} - Use
&
at the end of the line to run jobs background.jobs -l
to list the pid and job#. {StackXchange} - The
wait <PID>
andsleep <time>
can be links between commands. - A demo is here {Link-Baelung}
- The
wait
only works if the waited process is a child process of current process...